Installation instructions for STRipy (Client)
Please select your operating system for installation and set-up instructions.
Easy way (by using compiled binaries)
It is very easy to run STRipy by using the pre-compiled binaries. Download the compressed file and unpack the file (double-click on file). Drag STRipy.app to the Applications folder. Open STRipy from the Applications folder.
NB! When running the application for the first time you will get a security warning saying this app cannot be opened because the developer cannot be verified. Click "Cancel" to close the window and then go to "System Preferences", click on "Security & Privacy" and under the "General" tab (at the bottom) it should say: "STRipy was blocked from use because it is not from an identified developer". Click "Open Anyway" and also "Open" on the pop-up window.
If instead of STRipy there is a name of another application, then you need to make a choice for this one to remove the notification and display the one related to STRipy.
Run from source
You can also run the application from the source code. In order to do that, first make sure you have Python 3.8+ in your system. Then download STRipy from git repository git clone https://gitlab.com/andreassh/stripy-client.git and go to the downloaded folder cd stripy-client/
Install all required packages by executing: python3 -m pip install -r requirements.txt. In additional, you might also need to run: python3 -m pip install pywebview[qt]
When all required packages are installed, you can run the application through terminal by simply executing: python3 stri.py
Compile from source code
To create the application for macOS from source, firstly install py2app library for Python: python3 -m pip install py2app and then in the stripy-client folder run python3 create-macOS-app.py py2app (STRipy.app will be saved into the "dist" folder, which then needs to be dragged to the Applications folder).
Easy way (by using compiled binaries)
It is very easy to run STRipy by using the pre-compiled binaries. Download the compressed file. Unpack the file and then open Terminal, go to that folder and run STRipy by executing: ./STRipy
If you want to do everything through command line, then please run the following commands:
wget https://stripy.org/download/STRipy-v2.0-Linux.tar.gz
tar -xzvf STRipy-v2.0-Linux.tar.gz
./STRipy
Run from source
You can also run the application from the source code. In order to do that, first make sure you have Python 3.8+ in your system. Then download STRipy from git repository:
git clone https://gitlab.com/andreassh/stripy-client.git and go to the downloaded folder: cd stripy-client/
Install all required packages by executing: python3 -m pip install -r requirements.txt. In additional, you might also need to run: python3 -m pip install pywebview[qt]
When all required packages are installed, you can run the application through terminal by simply executing: python3 stri.py
Compile from source code
To create the executable file that is suitable for using in Linux, firstly install py2installer library for Python: python3 -m pip install pyinstaller and then in the stripy-client folder run: pyinstaller stri.py --name STRipy --onefile --hidden-import pysam.libctabixproxies --add-data "assets:assets" --icon icon.icns --upx-dir=..\upx391w (The executable file will be saved into the "dist" folder).
Easy way (by using compiled binaries)
It is also possible to run the Linux version of STRipy in Windows 10/11 through WSL.
To do that, there are few steps that has to be taken (only once). First of all, set up WSL in Windows 10/11 and install a Linux distribution (such as Ubuntu): https://docs.microsoft.com/en-us/windows/wsl/install
Please note that the installed Linux is a minimal OS without a graphical interface and it is missing the libraries required to run STRipy. Therefore, in order to successfully run STRipy, you need to download and install Xming X Server for Windows from https://sourceforge.net/projects/xming which will enable launching graphical applications.
Next, when you have opened the installed Linux distribution (a new window has opened where you can enter commands), you need to enable Web content engine library for GTK. To install and enable this, please run:
sudo apt update
sudo apt install gir1.2-webkit2-4.0
Download STRipy and unpack:
wget https://stripy.org/download/STRipy-v2.0-Linux.tar.gz
tar -xzvf STRipy-v2.0-Linux.tar.gz
To run STRipy (for the first and every other time), at first open XLaunch app in Windows (Keep default options, i.e. select "Multiple Windows" and "Display number" leave to 0) and click Next -> select "Start no client" and click Next -> then check "No Access Control" and click Next and finally click Finish.
When using WSL 1, then run export DISPLAY=:0 in WSL (Linux) terminal.
In case of WSL 2, run export DISPLAY=$(grep -m 1 nameserver /etc/resolv.conf | awk '{print $2}'):0.0 in WSL terminal.
Finally launch the app:
./STRipy
Run from source
You can also run the application from the source code. In order to do that, first make sure you have Python 3.8+ in your system. Then download STRipy from git repository:
git clone https://gitlab.com/andreassh/stripy-client.git and go to the downloaded folder: cd stripy-client/
Install all required packages by executing: python3 -m pip install -r requirements.txt. In additional, you might also need to run: python3 -m pip install pywebview[qt]
When all required packages are installed, you can run the application through terminal by simply executing: python3 stri.py
Compile from source code
To create the executable file that is suitable for using in Linux, firstly install py2installer library for Python: python3 -m pip install pyinstaller and then in the stripy-client folder run: pyinstaller stri.py --name STRipy --onefile --hidden-import pysam.libctabixproxies --add-data "assets:assets" --icon icon.icns --upx-dir=..\upx391w (The executable file will be saved into the "dist" folder).
Using the application
Genotyping a sample
It is very easy to use STRipy. To genotype a sample, please select the following on the home screen:
- Select from drop-down list either a Disease or Locus to target, or specify coordinates and motif manually into the Custom field.
- Choose the aligned and indexed BAM or CRAM file of the Sample you want to genotype
- If the selected locus is in one of the sex chromosomes, then select the selected sample's Sex (or let STRipy to detect this automatically, but always double-check the result)
- Select the name of the Genome assembly which was used to align the selected BAM or CRAM file (or let STRipy to detect this automatically)
- Choose the type of Analysis which can be either Standard or Extended:
- Standard: fast analysis (often between 5-15 seconds) which is recommended to use at the first try. Maximum detectable repeat size is limited to the fragment length.
- Extended: slower analysis (usually between 20 seconds to few minutes) which can be used when you want to expand the genotyping ability past the fragment length. This could be good to try when STRipy notifies of a potentially long allele or when you suspect an allele that is at least ~few hundred bp long. NB! Analysis of long STR alleles from short-read sequencing data is very complicated and often results either a under- or overestimated allele. Use this option carefully.
- Pick a Server where the genotyping takes place. Unless you have set up your own server, then Cloud is the only activated option.
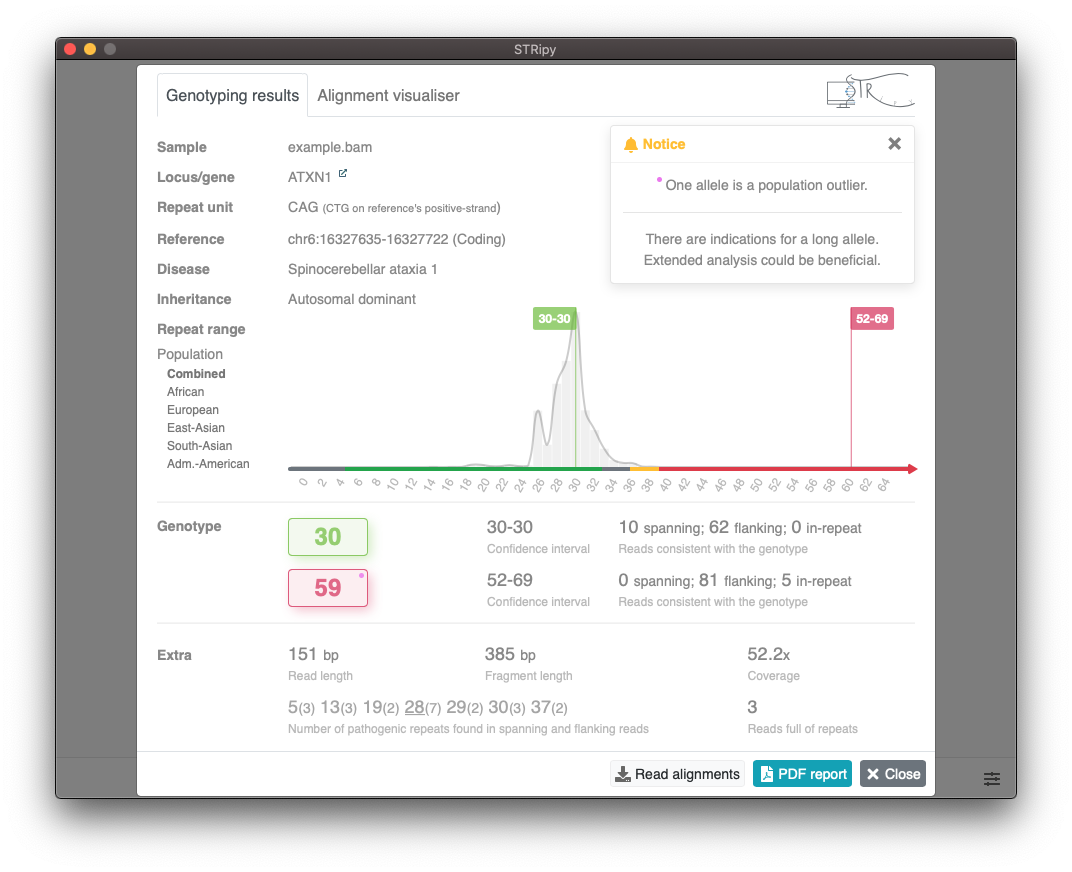
Viewing results
The following colour scheme is used which is based on data acquired from the literature:
Pink dot in the "Genotype" section is used to mark an allele that is a population outlier (Z-score ≥3.718). Population data is acquired by genotyping 1000 Genomes Project cohort.
Results in the "Genotype" section as well as the first row of the "Extra" section are coming from ExpansionHunter.
Bottom row in the "Extra" section displays results that are determined by STRipy. STRipy is analysing all reads and only counting the exact pathogenic repeat units (without substitutions/interruptions) in spanning and flanking reads, which is then reported with the number of reads in parentheses. Additionally, STRipy reports the number of reads that are fully made of the pathogenic repeat unit that can indicate a long allele. The bottom row is important while analysing replaced or nested type of repeats because ExpansionHunter counts the non-pathogenic repeat unit as well and as a result, reports a genotype which may not contain the pathogenic motif at all.
Read alignments/pileups for the STR locus can be viewed under the Alignment visualiser tab. This is a output of REViewer which then is colourised by STRipy based on the aforementioned colour scheme. Read alignments can be saved as a PDF file by clicking on the button.
Genotyping results can be saved as a PDF file by clicking on the button.
Using STRipy's Pipeline
STRipy's pipeline version is a non-graphical command-line version which is merged from STRipy's Server and Client. The pipeline version can be integrated into pipelines and can genotype multiple loci at the same time. Analysis report can be saved as HTML file for easy viewing of results. Click here to see a demo report!
If you have any requests or suggestions regarding the pipeline version and/or the outputted HTML report, then don't hesitate to contact the author.
Please see the installation instructions and configuration parameters on gitlab.com/andreassh/stripy-pipeline. We implemented a flag system to spot the potentially interesting loci.
Flags
- At least one allele is in "unknown" range AND repeat length is above the normal range* AND is a population outlier** OR one allele in pathogenic range but disease is recessive;
- At least one allele is in the "intermediate" range;
- At least one allele is in the "pathogenic" range IF it the disease is dominant OR both alleles are in the "pathogenic" range IF the disease is recessive;
*Repeat ranges are derived from the literature. Therefore, they are indicative, not definite.
**A blue dot is used to mark an allele that is a population outlier (Z-score ≥3.718). Population data is acquired by genotyping 1000 Genomes Project cohort.
Using the API
API address: https://api.stripy.org
Annotate an ExpansionHunter's VCF file
It is easy to annotate VCF files with disease names, inheritance and the range into which the repeat size falls using the command line. This can be done with 'curl' by specifying the VCF file which will be sent through STRipy's online annotation program. The same VCF file is returned where the loci that match with the ones in STRipy's database is annotated.
Example request and response:
POST /annotateVCF/file HTTP/1.1
Host: api.stripy.org
##fileformat=VCFv4.1
##INFO=<ID=DISID,Number=1,Type=String,Description="Disease ID as specified in the STRipy database">
##INFO=<ID=DISNAME,Number=1,Type=String,Description="Disease name as specified in the STRipy database">
##INFO=<ID=DISINHER,Number=1,Type=String,Description="Disease inheritance mode as specified in the STRipy database">
##INFO=<ID=DISRANGE,Number=1,Type=String,Description="Range for both allele repeats for the disease as specified in the STRipy database">
...header truncated...
#CHROM	POS	ID	REF	ALT	QUAL	FILTER	INFO	FORMAT	HG04225
chr9	27573528	.	C	<STR8>,<STR29>	.	PASS	END=27573546;REF=3;RL=18;RU=GGCCCC;VARID=C9ORF72;REPID=C9ORF72;DISID=FTDALS1;DISNAME=Amyotrophic lateral sclerosis and/or frontotemporal dementia;DISINHER=AD;DISRANGE=Normal/Pathogenic	GT:SO:REPCN:REPCI:ADSP:ADFL:ADIR:LC	1/2:SPANNING/INREPEAT:8/29:8-8/26-36:17/0:32/57:0/4:43.378378
...other loci...
Example command using curl and my_sample.vcf file; output will be saved as my_sample.annotated.vcf:
curl -F 'file=@my_sample.vcf' https://api.stripy.org/annotateVCF > my_sample.annotated.vcf
Create a variant catalogue for ExpansionHunter
Create a variant catalogue from the API input. For example, this allows to generate it from the command line via using wget or curl:
wget -O HTT_only.json https://api.stripy.org/catalogue/hg38/on/off/HTT
or
curl https://api.stripy.org/catalogue/hg38/on/off/CSTB,EIF4A3,PRNP,VWA1 > vntr_catalogue.json.
The genomes can be either "hg19", "hg38", or "hs1". To include "chr" in chromosome names, set the "use_chr_prefix" value to "on"; otherwise, use "off". To include off-target regions, set the "use_offtargets" value to "on"; if not, use "off". Specify a list of loci, separated by commas, to be included in the catalogue.
GET /catalogue/{genome}/{use_chr_prefix}/{use_offtargets}/{loci_ids} HTTP/1.1
Host: api.stripy.org
Example request and response:
GET /catalogue/hg38/on/off/HTT,DMPK,FXN HTTP/1.1
Retrieve information about a locus
Retrieves information about a locus (for example, HTT) in the database, including coordinates, motif and linked diseases. Notes: "IntermediateRange" is null if no intermediate range is specified; "Motif" and "MotifPlusStrand" is an array for RFC1 locus; NIPA1 locus has additional "GenomeExceptions" key for motif sequence on hg19 genome.
GET /locus/{locus_id} HTTP/1.1
Host: api.stripy.org
Example request and response:
GET /locus/HTT HTTP/1.1
Compare repeat length against the database
Compares the number of repeats (for example, 40 or 20/22) against the literature (under "Literature" key) and population data (under "Population" key). "Zscore" is calculated comparing the repeats to our population data, and IsOutlier returns true if Z-score is at least 3.718 (1 in 1000). If no standard deviation can be calculated then Zscore and IsOutlier turns to null. In case multiple diseases are linked to one locus, results for each of them will be returned (see the second example). One or two repeat lengths/alleles can be used.
GET /compare/{locus_id}/{repeats} HTTP/1.1
Host: api.stripy.org
Example (1) request and response:
GET /compare/HTT/40 HTTP/1.1
Instead of one numerical value, both alleles can be specified which are separated by slash, for example: 5/6.
GET /compare/{locus_id}/{repeats1}/{repeats2} HTTP/1.1
Host: api.stripy.org
Example (2) request and response:
GET /compare/COMP/5/6 HTTP/1.1